Recovering from Heat Damage

After my most recent bout with heat damage, I wasn’t too sure how to go about getting my curls back.  I wore my hair straight for Easter Sunday but decided to use the flat iron again later in the week after using oils in my hair.  My curls did not revert back like they normally did when I wore my hair straight and I was afraid that the damage was permanent.  Was I upset?  You damn skippy I was!  I couldn’t believe that I let this happen again.  Not only that, I just chopped off 1/2″ of damage at the start of the year which gave me curls galore.  Now I was right back where I started and worse.


What did I do you ask?  Well, I did what I always do when I need answers, I went to the internet.  I was pretty certain that what I was experiencing was permanent heat damage but I was really hoping that someone out there had a magic remedy.  I stumbled onto a YouTube video that I remembered watching by Taren916, where she used the Aphogee 2 step Protein Treatment to help repair her heat damage.  She showed a before shot where her hair was limp and not so curly and another after the treatment when her hair had more texture. 

After watching that, I went to the hair forums and read articles for more info on how the protein treatment worked.  Basically, heat can cause significant damage to the cuticle layer of the hair strand.  This is the protective outer layer (imagine tiny shingles that overlap one another).  Once these cuticles are damaged, the hair is vulnerable and more prone to dryness and breakage.  The protein in the Aphogee treatment helps to fill in the gaps where the hair strand is missing these important little pieces. 

So, the very next day, I shot over to Sally’s and made a B-line for the Aphogee products.  I still wasn’t too sure if this was all I needed so I grabbed a silicone based conditioner (the GVP version of Paul Mitchell’s The Detangler) and said a prayer.  After the application and rinsing it all out, I was very surprised to see curls where there was once very non-descript strands.  The treatment actually worked, but the curls were still looser than before (as you can see from the photo).  My hair was still much thicker at the roots.  Afterwards, I decided to go back to an old regimen I employed when I used to use semi-permanent color on my natural hair. 
Damaged hair regimen:
  • Deep condition 2x per week- 1x with moisture; 1x with protein
  • Stay away from heat…lol
  • Protective styles to avoid further damage
  • My curls 4 weeks after the treatment.
    Using braids to protect hair from too
    much manipulation
  • Silicone based conditioner for detangling and co-washing
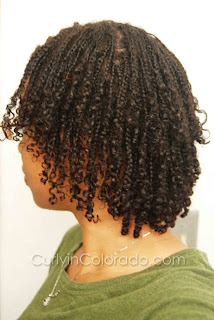
I added the silicone conditioner because the primary reason for using silicone in hair products is so that it can help mask damage incurred by heat styling, hair color and chemical treatments.   Thankfully, my hair is back to being nice and curly but is just a bit more stretched than before with a few lazy curls here and there.  Some people use heat for this effect but that was never my intention.  Needless to say, me and my curls are stepping away from the heat for a good, long while.

Choosing a Ceramic Flat Iron

My FHI Ceramic Flat Iron
When my first flat iron quit working after only one year of use, I decided that I would definitely look into buying something of better quality the next go ’round.  Little did I know that it would be 7 months before I would finally purchase a new one.  Instead of running out and replacing it right away, I decided to take my time and do some research.  One of the first things I did was start looking into styling options that didn’t require the use of heat.  This started me on my Natural Hair journey which meant that the flat iron of my dreams would have to be able to straighten my natural hair texture, kinks and all.
I looked at Consumer Reports on the subject and found tons of info on the different types of flat irons.  There are a lot of heat styling tools that are ceramic now but the real question is, how ceramic are they?  It turns out that my previous joke of a flat iron was only ceramic coated which would explain the $40 USD price tag.  The material started peeling and would catch my hair.  This exposed the metal plates underneath and caused lots of breakage.  However, professional tools that used full ceramic plates were priced way more than I could afford and were very fragile.  One drop and crack goes the flat iron.  I later read that the mid-range variety ($80-$150) used plates that have multiple layers of ceramic coating and sometimes even added tourmaline. 

 It is the tourmaline that helps the iron produce more negative ions.  No, this is not chemistry class folks, we’re talkin’ hair here!  Apparently the more negative ions the better the heat.  Of course, using direct heat on the hair is never considered a good thing but I found out that there are different types of heat.  This information explained how some flat irons give excellent results and also cause less damage while others burn the hair to a crisp.

Of all the brands out there I finally narrowed it down to the FHI Technique G2.  I found the pink version on sale at Ulta for $79 but still see it at Target for ten dollars more.  It definitely puts my old iron to shame but the sucker gets hot so I have to be extremely careful with it.  I like that it has a beveled edge which makes it really easy to do flips and curls.  If I could do it all over again I would hold out for the FHI Platform which has a dial so you can adjust the heat setting.  Maybe one day…a girl can dream, right?  

**Check out this article for more info on choosing a quality Flat Iron**