4 Month No Heat Challenge Results

curlyincolorado.com no heat challenge length checkI finally completed my No Heat Challenge which went from October 1, 2013 to February 1, 2014.  It may sound crazy but it was the longest that I had gone without using heat since my transition to natural hair.  At first, I thought maybe I was going to succumb to the urge to straighten my hair or use a blow dryer.  Once I got the hang of styling my hair in other ways, it ended up being easier than I expected.


During the challenge I allowed myself the use of my hooded dryer for roller sets and drying my wash n’ go curls.  Other than that, I usually just air dried my hair.  My favorite styles ended up being braid outs and ponytail roller sets.  These were easy ways to stretch my hair that also gave my hair manageability.
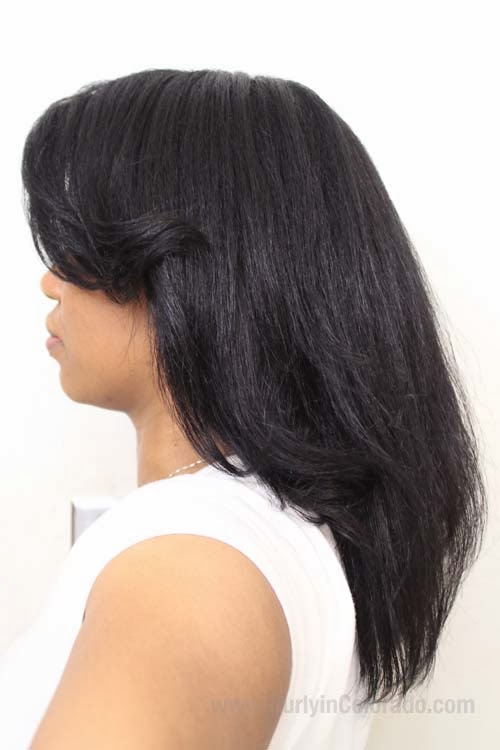
curlyincolorado.com no heat challenge length check
My Current Hair Length
February 2014

Once the four month challenge was over, I straightened my hair for a length check.  I was happy to see that my layers were finally growing out.  After flat ironing my hair I decided to give myself a much needed trim.  One of the things I noticed though was how many single strand knots I had to cut out.  Not good!  My thoughts on that were that maybe I should stay away from tightly curly styles until I get to a length where I’m comfortable with just maintaining.  For now, I’ll be using stretched styles to try and keep the knots under control.

I’ve decided that I’ll probably go another three months before using heat to straighten my hair again.  I really liked how the new hair growing in felt so much thicker and healthier.  I don’t want to damage it by using excess heat.  Overall, I’m pleased with the results and am glad that I challenged myself in this way.  I learned a lot about my hair and what it needs, which will help me obtain my goals.

Have you ever participated in a hair challenge?

The Benefits of Using Coconut Oil as a Pre-Poo Treatment

curlyincolorado.com coconut oil pre poo on natural hair
Getting ready to Pre-Poo with
Coconut Oil

After recently purchasing extra virgin coconut oil for the first time in ages, I have been on the huntpatchouli85 on Youtube.  Fast forward to this month where my hair is longer but in need of repair.  I have already been experiencing dryness and breakage so I can’t afford to make any more mistakes.
for more information on how to use it.  Years ago, I used the oil to combat frizz when my straight natural hair started to revert.  Later, I was inspired to try it in a moisturizing deep conditioning treatment mix demonstrated in a video by

I knew that there were a lot of benefits to using coconut oil but wasn’t exactly sure how to work the product into my weekly routine.  While looking at some Youtube videos on the subject I found out how great coconut oil is for pre-pooing.  Again, this is when you apply something to the hair, oils or conditioner, prior to using shampoo.  This helps the hair to retain moisture during the washing process.  Coconut oil has a molecular structure small enough for it to penetrate the hair strand.  When using it to pre-poo, you are helping the hair to hold onto it’s moisture.  In addition, the oil has the ability to prevent hygral fatigue.   This is when the strands swell and de-swell from constantly going from wet to dry.  This stretching and contracting can be damaging and even lead to protein loss.  Lately I have been wetting my hair and cleansing it often so, without this added protection, my hair is vulnerable.

I really want to retain as much length as possible this year.  I’m finally understanding the negative effects of shampoo (or any cleansing agent) and the toll that it is taking on my hair.  I’m hoping that the coconut oil will help my hair bounce back so I can start retaining more of my length.  I have included a link to a video by  GreenBeautyChannel that further illustrates the benefits of using coconut oil as a pre-poo.  Check it out!

COCONUT OIL VS. CONDITIONER PRE-POO
WHICH ONE IS BETTER AND WHY?

New Year; Same Hair Goal

Trying to get past this length in 2013

For my hair journey, the beginning of 2013 looks pretty much like the end of 2012.  My main focus this year will be to protect my hair from ME!  That’s right, I’ve figured out the real reason why I’m still sitting at the length I am now.  Some people call it “Scissor Happy” but I’m now calling it counter productive.  I really like when my ends have that blunt cut appearance and when they don’t, I’m pulling out the scissors.  As far as retaining length, with this way of thinking, I’m at a stand still with my hair.

Lately I have been looking for ways to distract myself because yes, I’ve been thinking about cutting again.  I hit APL (Arm Pit Length) at the sides a couple times in 2012 and saw it as an oppurtunity to even things up.  Now, I do still have bangs in the front and layers on the top and sides, so my bottom layer is still the lengthiest part of my hair overall.  I guess I have always wanted to help the other sections catch up to the rest which would mean trimming the longest bits little by little.  Still, even with that being the goal I figured I would just hover at BSL (Bra Strap Length) before trying to make my hair more even.  At this rate, I’ll never see BSL which for me is only two more inches away (in back; when the hair is stretched).

Last fall I counted and it looks like I gave myself at least 6-7 trims throughout the year.  Some to get rid of heat damage (searching for the perfect curl) and some to give my hair that look of blunt ends.  My last trim for 2012 was at the end of November and I honestly think I should put the scissors aside until the spring.  I really am curious to see where my hair will end up in the coming months but the urge to cut is always there.  Not sure if I can do it but I’m gonna try.

Protective Style: Flat Twist UpDo

I’m finally embracing the idea of protective styling to help me retain more length.  This concept has been so hard for me to grasp because I absolutely love wearing my hair out.  The more time I spend over at K.I.S.S. hair forum the more I see that during the week (Monday thru Friday) there really isn’t any need to wear my hair down.  I’m usually shuttling the kids to school, exercising and running errands which does not require a glam look.  Still, when I want to look somewhat put together I just throw my hair up into two large flat twists and I’m good.

Before, I discovered this look I was always wearing two french braids (under hand braiding) or two cornrows (over hand braiding).  Sometimes though I think the braids made me look a little juvenile so for this reason I started wearing the twists
more often.

Flat Twists secured
with a Barret

My process is pretty simple.  I discovered that the flat twists have lots more volume when I allow my hair to air dry first.  Usually after my wash day routine, I apply my leave-ins and just pull my hair back into a braided bun for a whole day until it is mostly dry.  Then I take the hair down so I can apply my moisturizer and seal with grapeseed or olive oil.  After this step, I separate my hair into two large sections, parting down the middle and pin one side up with a clip to keep it out of the way.  I lightly comb out the other side with a wide tooth comb and begin flat twisting from the front of my head all they way to the nape.  I found that the twist looks best when I grab smaller sections for each turn.  After twisting all the way down I let the twist sit for a few minutes because it will gradually loosen a bit and look fuller.  I repeat on the other section.  Once both flat twists have “grown,” I take the tail ends and twist them around each other.  I then tuck them at the base of the twists with a bobby pin or barrette.  If I want bangs I just take a small section at the front and do three small two-strand twists.  Then I swoop them and secure the bangs into one of the twists.  If I see any loose points along either twist I just use bobby pins to tighten things up.

I used three small two-strand twists
for a side swooped bang

I enjoy wearing this style because it has the potential to look really glam with a little makeup and some earrings.  This is also an easy style to take down so that I can moisturize and seal my hair whenever it is starting to feel dry.  The best thing is knowing that I’m taking care of my hair by simply keeping it tucked away.