Twistout Using Curls Unleashed Curl Defining Creme

I normally do braidouts when I want stretched hair because I know I’ll get consistent results.  The same is not true when I do twistouts.  Sometimes when I take the twists down, my hair is fuzzy and puffy before I even leave the house.  Other times I have trouble getting the twists to stay so the end result looks messy and not as defined as I would like.

This time I decided to use something to give the twists some hold and definition.  I reached for my Eco Styler gel (a staple) but thought maybe I should give the Curls Unleashed Curl Defining Creme a try.  The only other time that I used it was to do a wash n’ go style on wet hair.  I had really good results with it then but since I’ve been back to using my Eco gel I haven’t had much
use for it.

WATCH MY VIDEO ON HOW I DID A WASH N’ GO USING 


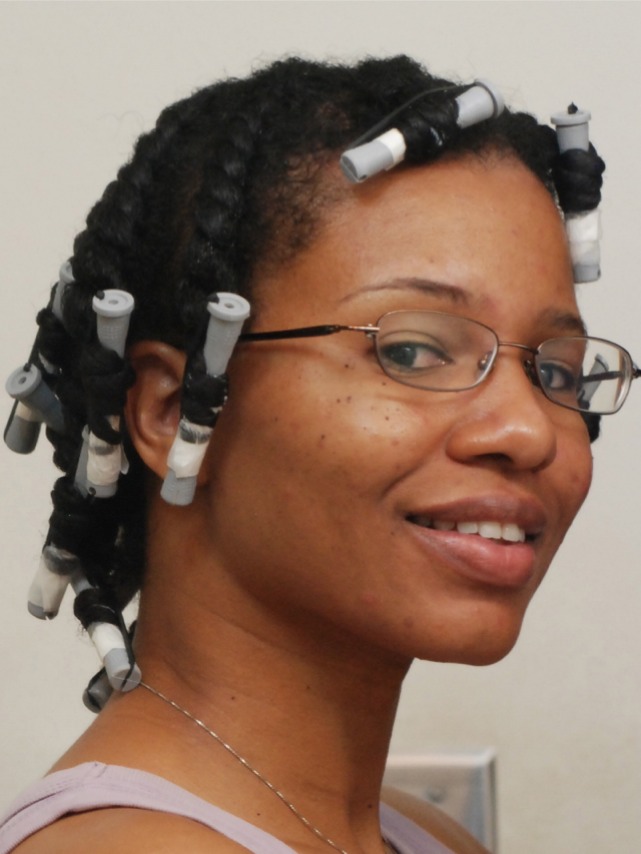
Small Grey Rods are great
for a spiral curl on the ends

For this twistout I started with clean hair.  First I applied my Paul Mitchell The Conditioner leave-in along with the Hollywood Beauty Olive Creme moisturizer.  I wanted to make sure that there was plenty of moisture under the Curls Unleashed product because I remember it having a firm hold.  I applied the Curl Defining Creme on top of the other two products and started doing two strand twists in medium size sections.  At the front I did flat twists on either side of my middle part and for my bangs.  Once all of the twists were done, I used small grey perm rods to spiral curl the ends.  I always use end papers for this step because I don’t want any of the ends to slip off of the rod while I’m sleeping.

When I woke early the next day, my hair was still damp so I decided to let it air dry completely rather than sit under the dryer.  The resulting twistout was so soft and defined I almost didn’t believe it.  The thing I liked most was that even after fluffing and styling my hair there wasn’t any frizz.  I like big hair and usually lose some definition when I separate and fluff.  I think I’m going to continue to
use this product when I want a nice twistout.  For now here are pics of my first try.

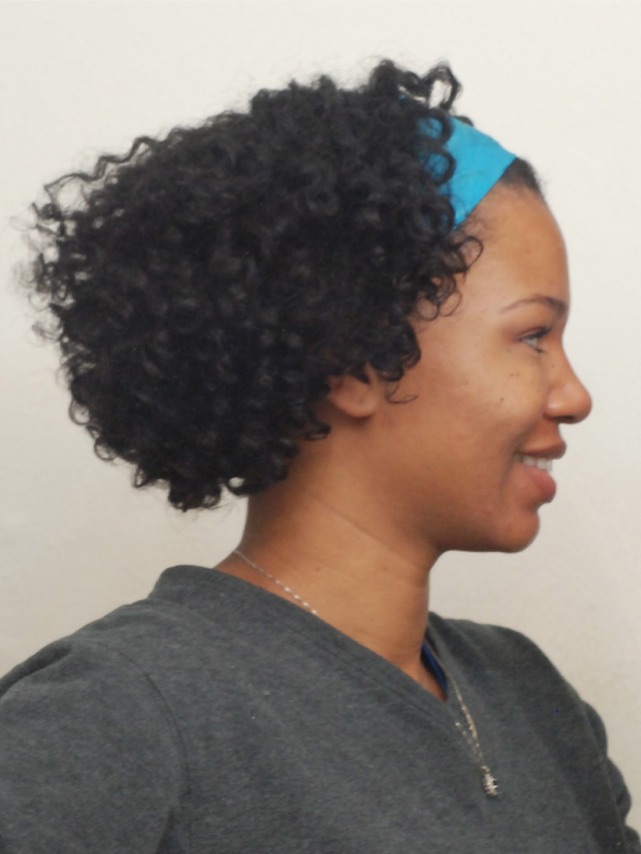
Curly Twistout results with a Satin Scarf for a headband
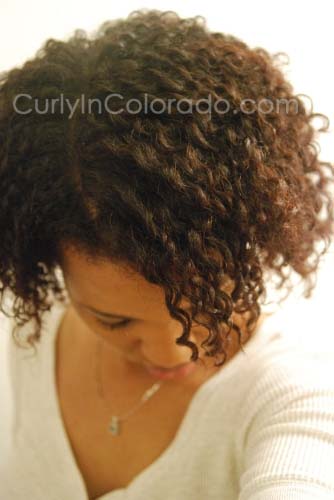
Before I separated the sections
After fluffing and separating

Protective Style: Flat Twist UpDo

I’m finally embracing the idea of protective styling to help me retain more length.  This concept has been so hard for me to grasp because I absolutely love wearing my hair out.  The more time I spend over at K.I.S.S. hair forum the more I see that during the week (Monday thru Friday) there really isn’t any need to wear my hair down.  I’m usually shuttling the kids to school, exercising and running errands which does not require a glam look.  Still, when I want to look somewhat put together I just throw my hair up into two large flat twists and I’m good.

Before, I discovered this look I was always wearing two french braids (under hand braiding) or two cornrows (over hand braiding).  Sometimes though I think the braids made me look a little juvenile so for this reason I started wearing the twists
more often.

Flat Twists secured
with a Barret

My process is pretty simple.  I discovered that the flat twists have lots more volume when I allow my hair to air dry first.  Usually after my wash day routine, I apply my leave-ins and just pull my hair back into a braided bun for a whole day until it is mostly dry.  Then I take the hair down so I can apply my moisturizer and seal with grapeseed or olive oil.  After this step, I separate my hair into two large sections, parting down the middle and pin one side up with a clip to keep it out of the way.  I lightly comb out the other side with a wide tooth comb and begin flat twisting from the front of my head all they way to the nape.  I found that the twist looks best when I grab smaller sections for each turn.  After twisting all the way down I let the twist sit for a few minutes because it will gradually loosen a bit and look fuller.  I repeat on the other section.  Once both flat twists have “grown,” I take the tail ends and twist them around each other.  I then tuck them at the base of the twists with a bobby pin or barrette.  If I want bangs I just take a small section at the front and do three small two-strand twists.  Then I swoop them and secure the bangs into one of the twists.  If I see any loose points along either twist I just use bobby pins to tighten things up.

I used three small two-strand twists
for a side swooped bang

I enjoy wearing this style because it has the potential to look really glam with a little makeup and some earrings.  This is also an easy style to take down so that I can moisturize and seal my hair whenever it is starting to feel dry.  The best thing is knowing that I’m taking care of my hair by simply keeping it tucked away.

Biking with Natural Hair

My Bike Helmet
with Flat Twists Underneath

My family and I love going on outdoor adventures.  This summer we have been doing a lot more bike riding together.  I always make sure that the kids wear their helmets but I haven’t really been into wearing mine.

That was until I noticed nearly every other adult on the bike path wearing theirs.  At the very least they had on a cap for sun protection.  So I decided it was time to get out the old bike helmet.  Never mind the fact that it makes me look like Kazoo from the Flintstones.  Safety first, right?  The only thing I had to figure out though was what to do with my thick, curly hair underneath.

When I go for a bike ride in the morning, the solution is pretty simple.  My hair is usually in twists or braids from the night before so I just wait until after the bike ride to take my hair down.  This means shuttling the kids to school while wearing a satin scarf on my head but hey, I know I’ll be cute later on in the day, so that’s alright.  I don’t even bother removing the scarf because it protects my hair while under the helmet.  Another option is after a braid out when my hair is more flexible, I can get my hair to “lay down” under the helmet without too much of a fight using bobby pins.

Flat Twists under Helmet
Back View

Other times though when my hair is up in a bun or puff, the helmet doesn’t really work.  Still, in Colorado you really can’t get away without some type of sun protection.  The high elevation here can make for some serious sun exposure so I still like to wear a visor and leave my hair up on top of my head like in the pic below.

So there you go Natural Hair Queens and Curly Goddesses…now there is no reason not to rock your head gear while on your bike ride.  Be safe and happy riding.

Rockin’ the Bun with
My Visor

Natural Style-Flat Twist-Out


While I was transitioning, I learned how to flat twist my hair by watching videos on YouTube.  At first, the technique eluded me and it seemed like I could never get the twists right.  I was always starting each one over and over.  I kept at it and now it is one of my favorite styles.  The only thing I haven’t quite figured out is how to get them to dry faster. 

This weekend I decided to do some flat twisting once again for a soft wavy look.  One thing I figured out is that if I twist in rows from the crown and go back towards my nape, I end up with pretty little spirals that fall down around my face. 
Another tip I picked up over at CurlyNikki.com is to secure each flat twist with a bobby pin so that it doesn’t unravel.  Sometimes I use rollers on the ends for a Twist n’ Curl or just leave the ends out for a faster drying time.  

Flat Twists in Rows for soft
Curls that frame the face
After I washed and conditioned my hair, I applied Giovanni Direct Leave-In and a little olive oil to seal the moisture in. Then I used my Aloe Vera/Water/Glycerin spray to re-wet each section before detangling with my Denman brush.  After that, I twisted each section until the hair began to come away from the scalp and pinned the twist down before twisting to the ends.  

The next day, it was a teeny bit damp so I took them down and used a diffuser to dry the hair completely.  That night I twisted them again and used Palmer’s Coconut Oil Formula Replenishing Hair Milk, a little more water and Shea Butter to set the twists for another day.  This time the twists were shiny and the hold lasted a couple more days without re-twisting. This may be my new wintertime style!