To Market, to Market

This weekend I’m helping my husband sell the plants he has grown for our  Heirloom Vegetable Plant Sale in Denver.  This is our second year and the turnout has been great so far.  I have to admit that the past ten weeks have been full of ups and downs.  Still, we like the fact that the plants we watched grow from seed are now strong, healthy and ready for the garden.


Why buy Heirlooms?

Heirloom Tomatoes and Peppers

Normally you’ll find hybrid vegetable plants at your Big Box stores like Home Depot and Walmart.  This is when you cross two plant varieties to create a completely new one (a hybrid).  Because of this, the seeds cannot be saved to plant the following season.  Heirloom vegetables offer more taste and nutritional value than those that are grown from hybrid varieties.  Also, the seeds can be saved and used to grow new plants the following season.

It’s fun to hear how the plants will be added to gardens and containers.  Still, even though we have been lucky with the warmer temperatures this spring, we explain to our customers the importance of waiting until May to plant them.  This is because of the unpredictable Colorado weather.  One frosty night can stop a healthy vegetable plant in its’ tracks.

We are both weary from today’s activities but happy to know that there are lots of people in town who prefer to by from local growers like my Husband.  We’re so excited to meet others who appreciate the value of our heirloom plants.  The plant sale will continue through Sunday.  Here are some pics from the first day.

Straight Eight Cucumbers

Heirloom Bell Peppers

Genoa Basil

 CLICK HERE  for more details on the Plant Sale

DIY Eco Styler Gel Custard Recipe

After many months of searching for an alternative to Eco Styler Gel, I finally resigned to the fact that it’s the only gel that gives the hold and definition my curls crave.  Still, I always got the dreaded dry, crunchy feeling everytime I used it.  I usually apply a leave-in to my wet hair and seal the moisture in with an oil underneath the gel.  No matter what, I kept getting the same result.  After reading through the book, Curly Girl, by Lorraine Massey, I found out that the crunch or “cast” the gel leaves behind is actually a good thing.  This is when you know your curls have been set into place.  I found this to be true because after air drying, I’m usually able to fluff and style my hair without worrying about losing my curl definition.  The book suggests that you scrunch the hair to remove the crunch but I sometimes kept getting a dry feeling after this step.
I figured out that the combination of an oil and a mositurizer underneath the gel gave me much softer hair.  This however led to applying lots of products one by one.  By the time I reached the front sections of my hair it was dry and not as manageable.  I wanted a way to apply the products quicker so I decided to just whip them all together and came up with a nice custard consistency.  I’m realizing that this is a much easier way to apply my products and my curls love it!  
Here’s the recipe I came up with


Eco Styler Gel Custard


6 oz. Argan Oil Eco Styler Gel (or fill a 12 oz container half way)
2 Tblsp. Hollywood Beauty Olive Creme Hairdress for Dry Hair*
1 Tblsp. Castor/Coconut Oil Mix**


Place ingredients in a small container.  Whip together until all ingredients are combined.   The mixture will have a pudding like consistency. 


*You can substitute another moisturizer; one that pairs well with Eco Gel
**I use a 50/50 Castor/Coconut oil mix to seal my hair.  For this recipe I just used 1 Tblsp of my pre-mixed oil.

The Application

After cleansing and conditioning, I apply my leave-in conditioner (currently Paul Mitchell’s The Conditioner) to my hair while it’s still wet.  Next I section my hair into four sections to keep my hair up while I’m styling.  Within each section I make small parts and apply my Eco Gel Custard.  I use a smoothing and raking motion to help give the curls definition.  I’ve also started sealing the hair with oil after applying the gel custard for an even softer hold but this is optional.  Then, I let it airdry for about an hour or so before I use a blow dryer on the roots.  You can also plop the hair with a T-Shirt to help with the drying time or just continue to air dry.

Final Thoughts

I’m finding that the mixture also works on my edges when I wear my hair up.  I haven’t done a braid-out or twist-out with it yet but it looks like it may give good results.   I’m going to continue to play with the recipe but this version seems to work well on my hair which is a 4a/4b texture.  I’ve also started using it on my son’s curly 3b/3c/4a hair and it is also responding well.  The only thing I noticed is that I’m getting a lot more shrinkage because my curls just love the moisture.  To get more hang time I usually just stretch it by pulling it back at night.


Revisiting Braid Outs and Twist Outs

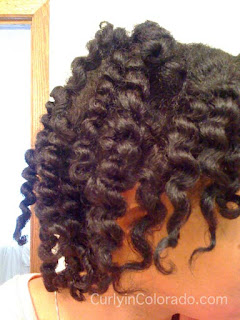
Large Twists
for a Twist Out Style

I’m always searching for new ways to style my hair because I love variety.  Recently though, I decided to just go back to the techniques that got my hair to where it is now.  During my first year with natural hair, braids and twists were what I used to stretch my hair for a bigger look.  They also helped to keep my hair protected at night.   After watching a couple of my favorite YouTubers, I was inspired to try something a little different.  I decided to try styling my hair with braids and twists but only use one product; leave-in conditioner.

Using small to medium individual
braids for more definition
In videos by JoStylin and HairCrush, both ladies mentioned that the only product used to style their hair was leave-in conditioner.  Of course I was lookin’ back at the screen and thinking, “Yeah, right.  That won’t work on my hair”.  Well, it not only worked but it also resulted in some of the best twist outs and braid outs I’ve had in a while!  

I started by using Giovanni Direct Leave-in because it’s what I had on hand.  Before, it seemed like it was too heavy on my hair and I kept getting this foaming action when I combed it through wet hair.  I realized that this “excess” conditioner dries clear and leaves the hair really moisturized.  Not only that, I was really happy to see my twists staying together and not unraveling like they used to.  I’m so excited about this discovery because using one product to style will save money while also helping me to “keep it simple”.

Here are some of the styles I’ve tried so far
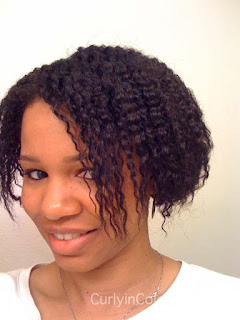
Twist out Definition

Faux Bob Style
with hair textured with a Braid Out

Faux Bob Front View
With ends pinned under

Braided Ponytail Back View
Braid Out Style
Cornrows up into a ponytail

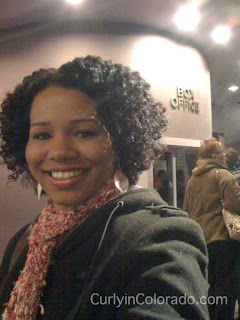
Natural Hair Out on the Town

Valentine’s Day High Puff

I’ve been revisiting some old styles with my hair recently and decided to wear them out to a few special events.  For Valentine’s Day the Hubby and I ended up hanging out with the kids for dinner so we went to one of our favorite mexican restaurants, Little Anita’s.  The food was great as always so I was glad we got to share it with the little ones who love to eat.

I decided to style my hair in a high puff that was pushed forward.  I did a curly twist-out a couple nights before so for this I just spritzed my hair with diluted leave-in conditioner and slicked the edges and sides with Eco Styler gel.  I didn’t realize my puff was so big but it actually looked really nice and went well with my new dress and earrings.

For another outing I went with my mom to see the play, “God, How Did We Get Here,” a romantic dramedy about relationships.   My mother’s friend, Dwight Cain, sang a song during the final scene of the play.  There were some really hilarious scenes and it was a treat to see an original theatre production which featured local actors.

For this event I decided to go with a flat twist-out style.  This one took about thirty minutes to prep the night before with flat twists in front and individual two strand twists in back.  I started with wet, freshly co-washed hair and applied Giovanni Direct Leave-in Conditioner in four sections.  Before twisting, I applied a small amount of my homemade whipped shea butter to each twist section.  The style was very defined and had lots of volume.  I used small grey perm rods on the end of each twist for a little extra curl definition.  I was even able to get a second day out of the style by protecting it with a satin bonnet overnight.

Here are some pictures I took while out on the town

Little Anita’s Mexican Restaurant, Denver
The Kids enjoyed their Nachos with all the Fixin’s

Waiting for the Show
at the
After Thought Theatre, Denver
Ticket Art
Thanks for the Tickets, D  đꙂ

Me and Mom
Having fun at the show


Are Braids a Protective Style?

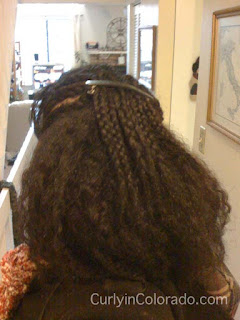
Every few months I like to do a style where I braid my own hair into small individual braids.  I usually leave them in for three to four weeks and enjoy how easy they are to maintain.  I leave about an inch of hair out on the end of each braid so that when I wet them and apply product, the hair curls up.

My hair in small individual braids

Up until recently I thought that this was a protective style.  Technically a protective style is one that will “protect” the ends of the hair strands.  Since my ends are actually left out, the style is really more “low maintenance” than “protective”.

What about braids that are done by adding extension hair?
These braids are commonly considered a protective style because the hair is kept braided for a long period of time.  The hair is not being styled in the usual way (i.e. combing, brushing etc.) which can be a benefit if the hair is moisturized daily.  However, the ends of the hair are still out in a sense because the braids themselves are out which can lead to dry hair.  The key to length retention is making sure the hair stays moisturized; especially the ends which are the oldest part of the hair strand.  This is possibly why so many have experienced dryness and breakage after wearing braids for a long period of time.  Braids can be a great style to “protect” the hair from manipulation that occurs during styling but ultimately extra steps must be taken in order to insure the hair is still healthy when the braids are taken down.

The following are some tips to consider for braided hair:

Use braids that are small to large in size  
Mini or Micro braids may look attractive but have been known to cause damage and breakage.

Know when to remove your braids
Individual braids can be left in for up to 2 months; Cornrows for 2 weeks up to 1 month with proper care.

Keep your hair moisturized  
Since the hair is constantly out, the exposure to air and the elements can be drying.  Spritz
the braids daily with a water based moisturizing spray

Braid hair using medium tension
Hair does not have to be braided so tight that the scalp is left feeling sore.  Tight braiding can lead to traction alopecia which is hair loss at the scalp level.  A secure even braid can be done with medium tension.

Personally, I find it’s best for my hair when I apply a small amount of Raw Unrefined Shea Butter to each individual braid.  This not only helps to seal in moisture but also gives each braid a neat appearance and shine.

Check out my Aloe Vera Spray Leave-In recipe for a moisturizing braid spray