Keeping My Hair Moisturized While Protective Styling

curlyincolorado.com keeping hair moisturized protective styling
It’s a wig!
protective styling with
this full cap wig by Freetress

Last week I started a personal protective style challenge.  A protective style is one that protects the ends of your hair by tucking them away.  My personal challenge is to style my hair this way for a few months.  This will be challenging because I prefer to wear my hair down more often than not.  Hopefully this will lead to the length retention I need in order to gain a few more inches this year.  I plan to do this by wearing my hair in up dos and
under wigs.

Right now,  I only have two wigs and plan to purchase a couple more.   I’ll also be styling my hair in buns, braids and flat twists when I’m not wearing a wig.  I’m doing all of this to keep myself from manipulating my hair.  I suspect that the constant styling
I’m used to has led to my hair length plateau.  For me, more styling
tends to lead to more trimming.

curlyincolorado.com keeping hair moisturized protective styling
The moisturizer that saved the day!

Before braiding my hair up last week, I cleansed my hair and scalp with a sulfate free shampoo.  I towel dried my hair and applied leave-in conditioner and grapeseed oil to seal in the moisture.  I assumed that this would be enough to keep my hair moisturized for at least a couple of days.  I also used Eco Styler hair gel to smooth my edges down.  Lastly, I braided my hair into two dutch braids like the ones in my braiding video.  Then I wore my wig during the day and wrapped my hair up at night for about two days.

I  thought that the products and the fact that my hair was braided meant that my hair would stay moisturized under my wig.  Boy was I wrong!  A couple of days later I took my hair down and my hair was so dry.  I quickly applied some moisturizer and then sealed with the grapeseed oil again.  I braided it back up and hoped for the best.  The next day, I could tell that my hair was feeling softer but I still wanted to give it more moisture.  I ended up cleansing my hair again and conditioning.  I decided to do a wash and go style using a heavy conditioner as my leave-in, moisturizer, oil and then gel.  My hair had so much life!  The moisturizer I think was the key.  My leave-in conditioner was not enough on its own.

curlyincolorado.com keeping hair moisturized protective styling
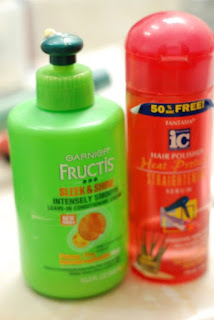
My current combination of products
to keep my hair moisturized while protective styling

After wearing my hair curly for a few days, I decided to try again.  This time, after my cleansing routine, I applied a heavy conditioner as my leave-in, moisturizer and grapeseed oil.  Then I brushed my hair back into a simple bun.

I can tell a huge difference in how my hair feels.  If this combination of products works for me, I will continue to do this throughout my protective style challenge.

My No Heat Blow Out

I’ve been straightening my natural hair nearly once each month ever since I went natural over three years ago.  I used to blowdry my hair every time but found that it made my straight hair feel dry.  I also felt like using two heat styling tools in one session was too much heat for my hair.  I decided to start using another method to dry my hair before using the flat iron while stretching it at the same time.

Air Drying
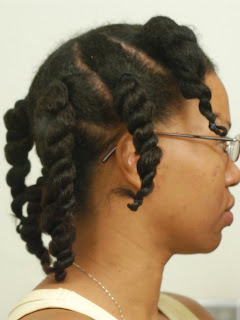
Basically, I let my hair air dry which takes longer but works great for me because my hair actually absorbs the product better.  My favorite method is to use ponytails with the ends two strand twisted.  This way the roots lay flatter and the hair dries in a smooth wavy pattern.  You can also use braids but I found that the twists dry quicker and serve the same purpose; stretch the hair while it dries.  Another favorite is to pull all of my hair back into a bun with the front and sides slicked back.  I’ll wear this as a style for a whole day and then at night, part it down the middle and do two french braids to help dry the center.

Brush it Out

Air drying overnight using ponytails with
two strand twists

The final step of the process is to take down the twists or braids and brush the hair out.  I like to use a paddle brush but a wide tooth comb also works.  I realize it’s considered a no-no to do this on dry hair but this is possible because of the products I use.  While my hair is still damp, I always apply a creamy leave-in conditioner, oil and a hair serum on each section.  This makes my hair soft enough to comb through once it is dry.

The Result
When my hair is dry and brushed out, it still looks just as big and stretched as a blowout.  It amazes me that so many naturals grab the blow dryer whenever they want to have stretched hair.  Sure the blowdryer is faster but why risk the damage?   Since I discovered how to do this it has become the method I use to stretch my hair everytime I want to straighten it or see some length.

I use a Creamy Leave-in Conditioner and Hair Serum
for dry hair soft enough to brush through

Wearing a bun all day gets the edges smooth
while drying

Updated Hair Regimen and Products List

I was looking through my blog the other day and noticed that I still had my old regimen from Fall of 2010 up.  There were lots of products listed that I haven’t used in ages so I figured it was time to update it.  Here is my current regimen and products list.  I may make some changes (I always do) but this is what is working for me right now.

NOTE: where products are bulleted I just use one of the items listed

Pre-Cleanse

I part my hair in 4 sections and apply conditioner prior to cleansing with shampoo or conditioner.  This helps to stretch out my shrunken hair and remove any shed hairs.  This step also helps with detangling.

Shampoo-1-2 times per week
  • Elasta QP Creme Conditioning Shampoo 
  • TheraNeem Naturals Moisture Therapy Shampoo (sulfate free)
  • KeraCare Dry & Itchy Scalp Anti-Dandruff Moisturizing Shampoo
  • Neutrogena Triple Moisture Cream Lather Shampoo
Co-wash-1-2 times per week
  • Suave Naturals Coconut Conditioner
  • Tresemme Naturals Nourishing Moisture Conditioner
Rinses-After Shampoo
  • Oil Rinse-I use grapeseed, olive or coconut oil.  I sometimes do this in place of deep conditioning.  This step also helps with detangling.
  • Apple Cider Vinegar Rinse (ACV)-I do this step after using shampoo to help my hair get back to a normal pH.  I either do the rinse before or after applying conditioner
Detangling Method
I detangle while my hair is soaking wet and saturated with conditioner.  The hair is parted in four sections.  I start by finger combing and then use a denman brush on each section.  I do this 2-3 times per week when wearing wash n’ go’s or once per week if wearing stretched styles.

Deep Conditioning Treatments* 1x per week 
  • Hot Oil Treatment with Coconut, Olive or Grapeseed Oils
  • Tresemme Naturals Nourishing Moisture conditioner with Honey or Olive Oil added
 *I do most of my treatments under a hooded dryer for 40 minutes

Moisturizers*

  • Extra Virgin Coconut Oil
  • Aloe & Veg. Glycerin Spray (homemade)
  • Paul Mitchell “The Conditioner” Leave-in
  • Garnier Fructis Leave-in (for heat styling)
  • Hollywood Beauty Olive Creme
To Seal Ends*
  • Coconut Oil mixed with Castor Oil
  • Olive Oil
  • Shea Butter
  • Grapeseed Oil
*I apply Leave-in conditioner after each wash for moisture.  After that I moisturize when needed.

Curl Definers
  •  Eco Gels-The Pink version and Argan Oil (red)
  • Kinky Curly Curling Custard
  • Curls Unleashed Take Command Curl Defining Creme (trial)

*I always use my Paul Mitchell The Conditioner Leave-in under a curl definer for added softnes and moisture


Styling*

Roller Sets, Curly Braidouts,  Wash n Go’s, Puffs, Buns, Banded Ponytails, Flat Twists, French Braids
*Currently taking a long break from heat styling
Henna-Once every 3 months
I have started doing the 2 step Henna/Indigo process which gives me a natural black tone  


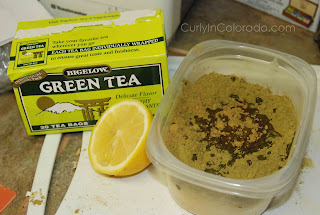
What I add to my Henna mix

  • Green Tea and Water (enough to make it the right consistency)
  • Olive Oil (usually add this right before application)
  • Lemon Juice (when I want more color)

    I sometimes add powder to darken the hair and maintain curls.  For my Indigo mix I only add water and a little salt.  For each step (henna & indigo) I make sure to co-wash after rinsing out.  This helps to keep the hair soft.

    Review: Shea Moisture Conditioning Curl & Style Milk

    Shea Moisture’s Curl & Style Milk
    for Thick, Curly Hair

    I’ve been hearing so much about the Shea Moisture line and have been wanting to try it out.  All of the products are made from natural ingredients which is a plus.  The haircare items seem to be targeted mostly at people with curly or even kinky hair.  Since they carry it at my local Target store I thought I would finally give it a whirl.

    Now remember, my guidelines are the following:

    • It has to be affordable (the amount vs. the price)
    • It needs to be easily accessible (if I can get it locally this is a plus)
    • It has to work for my hair (kinky, curly), my husbands’ straight hair (in most cases) and our kids’ 3b/3c curly hair

    I most recently purchased the Organic Coconut & Hibiscus Conditioning Curl & Style Milk.  I paid $9.99 USD for an 8 oz./237 ml. size bottle.  The texture is a lightweight, creamy consistency and, in my opinion, has a strong pina colada fragrance.  Since this line is geared towards curly hair, I’m not expecting my husband to rave about it but he has been known to dabble in my products.  As for me and my kids, it worked differently for all of us.  My twins have fluffy, big curls that have a satiny feel (3b).  This product weighed their hair down and made it look a tiny bit greasy.  (I normally use Giovanni Direct Leave-In to moisturize their hair and will continue to do so once this runs out.)  My oldest son has longer (3b/3c) hair and, while this made his hair soft and easier to manage, it did not provide enough hold for his curls to last all day.  His hair tends to get really puffy without something to weigh the curls down. 

    For my hair which is a 4a/4b texture, I was really happy with how soft my hair felt after using it.  My hair definitely felt moisturized and more manageable.  Another plus was how much softer my hair felt when I used it under my Olive Oil Eco Styler Gel.  The only thing I didn’t like is how fast I was going through the product.  We were already halfway through the bottle after a little over 1 week.  Once I saw this, I started to reach for my Palmers Coconut Oil Replinishing Hair Milk instead in order to save on this product.

    Overall, I think the Shea Moisture Curl & Style Milk is great as a leave-in type moisturizer that makes the hair soft and manageable.  However, I have achieved similar results by using my Aloe Vera/ Leave-in Conditioner spray and sealing with oil.  Follow that with the Palmer’s to make the curls pop and I’m good to go.  I probably won’t purchase this product again based on the little amount you get for the price.  I’m happiest with products that work for all of us and our different textures so getting more for less is a huge factor.  Still it’s worth a try if you’re looking for a good water based moisturizer and the price falls within your budget.